
What if the difference between a stress-free arrival and a pile of shattered heirlooms was just a simple sequence of vertical walls? About 62% of people moving this year will handle the loading process themselves, yet most start without a clear moving truck packing diagram. You don’t have to guess where the heavy appliances go or worry about running out of floor space halfway through the afternoon. Packing a truck shouldn’t feel like a high-stakes game of Tetris where you’re constantly losing.
We know the pressure of staring at a driveway full of boxes while the sun goes down. You want a move that’s efficient and safe without the frustration of making extra trips. This guide provides a clear, tier-based strategy to maximize your rental space while keeping the vehicle perfectly balanced. We’ll walk through the 60/40 weight distribution rule and show you exactly how to stack your belongings. You’ll gain the confidence to load like a pro, ensuring your items stay secure and your drive remains safe from start to finish.
Key Takeaways
- Visualize your cargo as a series of vertical tiers to eliminate wasted space and prevent shifting during transit.
- Use a professional moving truck packing diagram to sequence your load, starting with heavy appliances at the front for maximum stability.
- Apply the 60/40 weight distribution rule to keep your center of gravity low and ensure the truck is safe to drive.
- Utilize “Mom’s Attic” and high compartments for fragile items to keep them protected from heavier furniture.
- Select the correct truck size by accounting for the 15-20% inventory underestimate common in DIY moves.
Understanding the Moving Truck Packing Diagram: The Tier System
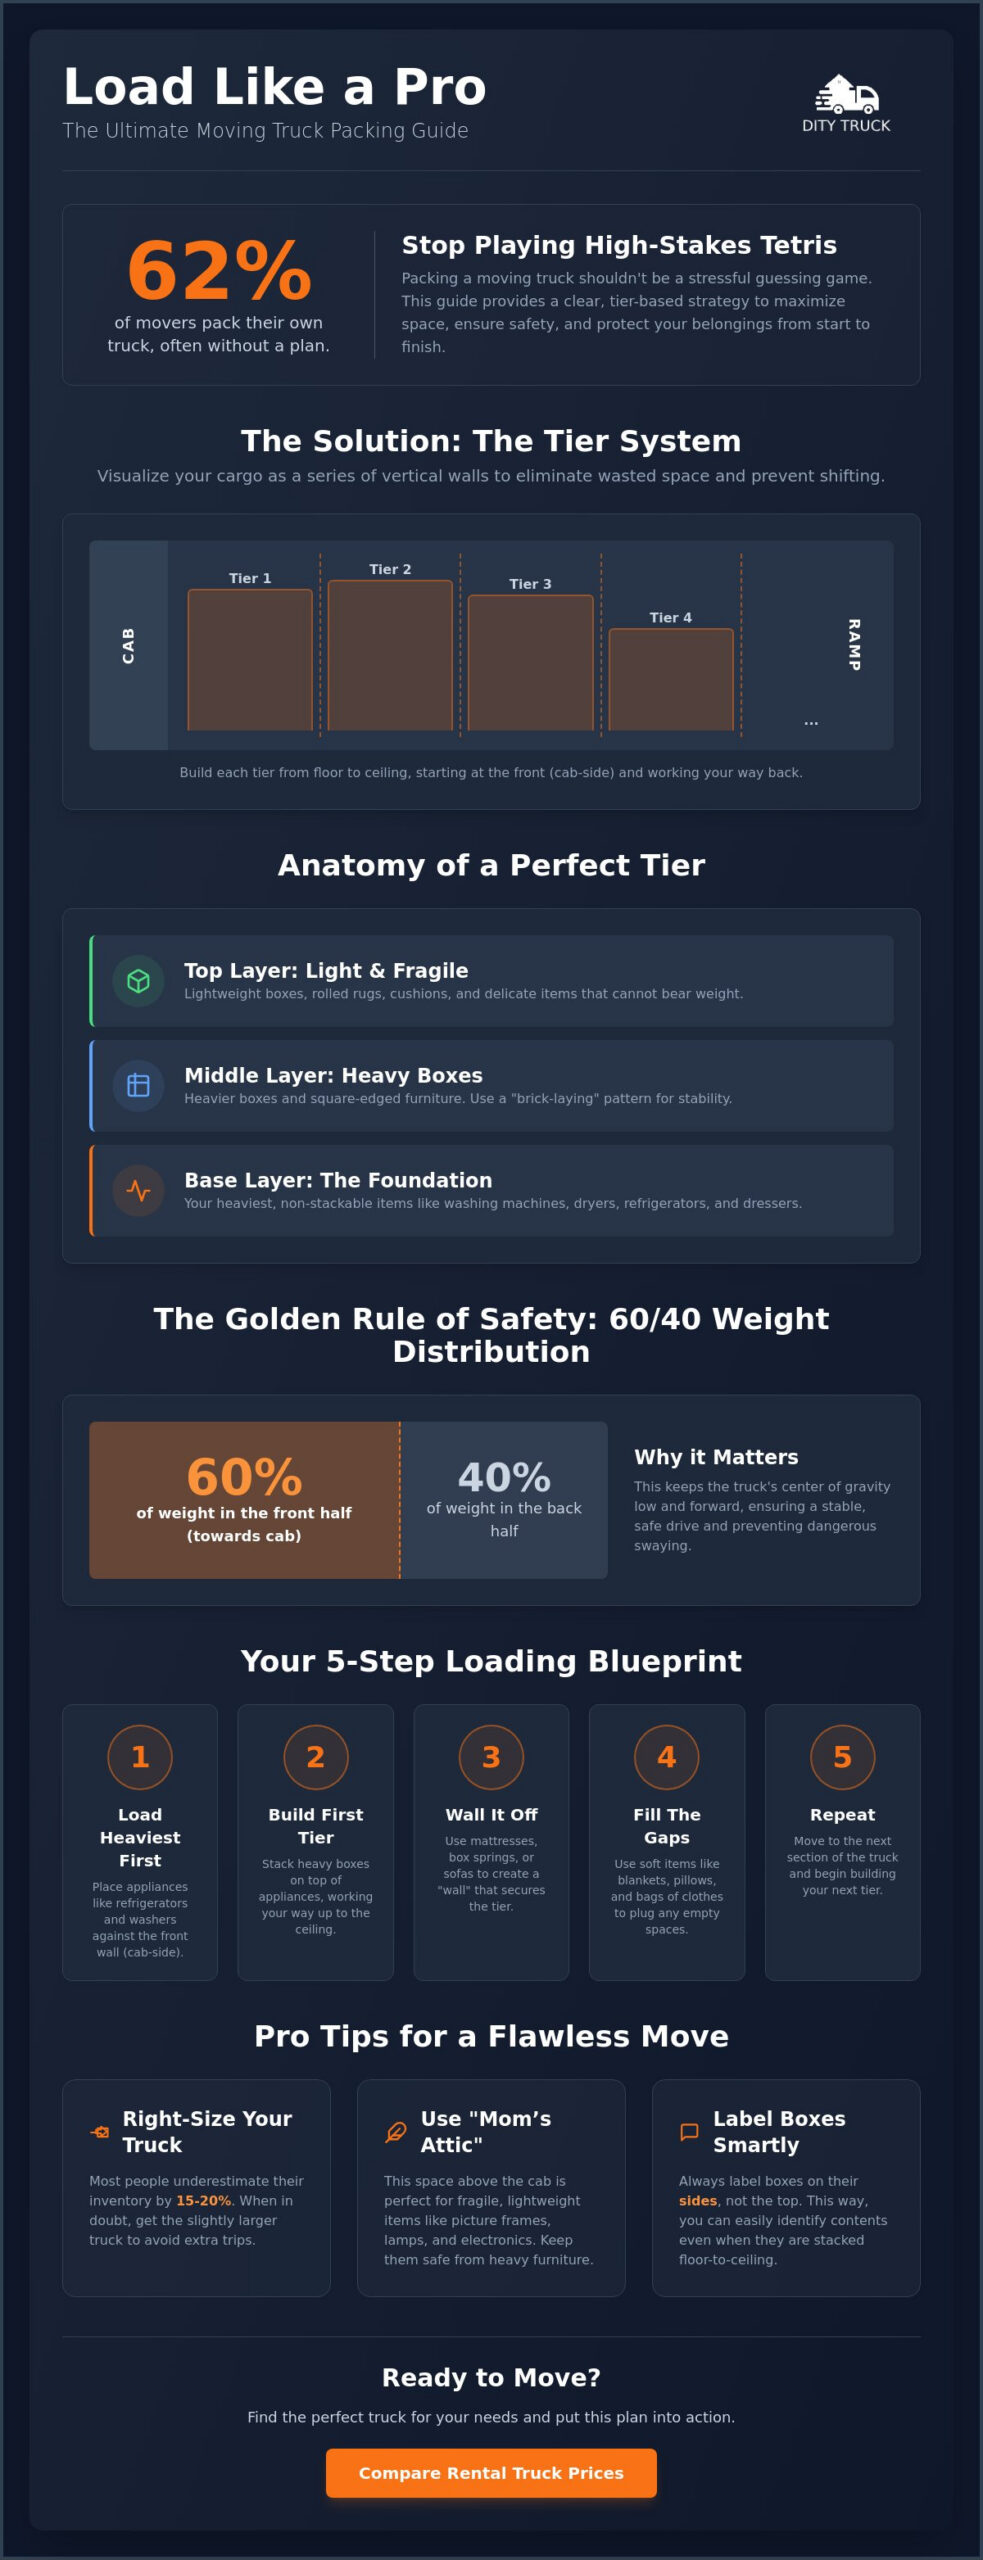
A moving truck packing diagram is more than just a sketch. It is a structural blueprint for your move. It visualizes the cargo area as a series of distinct vertical layers known as tiers. A packing tier is a vertical wall of inventory built from the back of the truck to the front. These sections are typically two to three feet wide and span from the floor all the way to the ceiling. By treating your inventory as a series of walls rather than a loose pile, you eliminate the “avalanche effect” that occurs during sudden stops or sharp turns. This method relies on the fundamental principles of weight distribution to ensure the truck remains stable and easy to handle on the road. It turns a chaotic cargo hold into a disciplined, organized space.
The Anatomy of a Perfect Tier
Every tier acts as a standalone unit of stability. You must build each one with a clear hierarchy of weight and shape. Start with the base layer. This is your foundation. Use heavy, non-stackable items like washing machines, dryers, or heavy plastic crates to create a level ground. Next is the middle layer. Place heavy boxes and square-edged furniture pieces here. This fills the bulk of the tier and provides a flat surface for the next level. Finally, finish with the top layer. Reserve the space near the ceiling for lightweight boxes, rolled rugs, cushions, and fragile items that cannot bear weight. By following this internal structure, you create a solid block that resists shifting. Each tier should be tightly packed before you move on to the next one.
Why Visualizing Your Load Matters
Relying on a moving truck packing diagram removes the guesswork from your moving day. It stops the mid-move “Tetris” stress that happens when you realize you’ve boxed yourself into a corner. When you see the truck as a series of tiers, you can identify empty pockets of air before they become a problem. These gaps are dangerous. They allow items to slide and collide during transit. A visual plan also helps you estimate your space requirements accurately. Since many people underestimate their inventory by 15% to 20%, having a diagram allows you to see if your truck is actually up to the task. It provides a clear roadmap that keeps the process moving forward without constant pauses for reorganization. You save time, protect your belongings, and keep your sanity intact.
A Step-by-Step Guide to Executing Your Packing Diagram
Executing your moving truck packing diagram requires a disciplined order of operations. You don’t just throw items in. You build a structure. Following a specific sequence ensures that every square inch of the rental truck is utilized while keeping your belongings safe. Think of it as a professional assembly line. You move from the back of the truck toward the ramp, completing one structural wall at a time before starting the next. This methodical approach stops the chaos before it starts.
- Step 1: Load the largest, heaviest appliances against the back wall. This is the area closest to the truck cab.
- Step 2: Build your first tier. Stack heavy boxes and sturdy items directly on top of those appliances to reach the ceiling.
- Step 3: Use long, flat items like mattresses, box springs, or sofas to “wall off” the tier. This locks the boxes in place.
- Step 4: Fill the cracks. Use soft items like rolled blankets, pillows, or bags of clothing to plug any small gaps.
- Step 5: Repeat the process. Move to the next 2-foot section of the truck and start the next tier.
Building the Foundation with Heavy Items
Stability starts at the floor. Place washers, dryers, and refrigerators directly against the back wall. This keeps the heaviest weight centered between the wheels. It improves driving stability. Ensure all appliances stay upright. Never lay a fridge on its side. This protects the cooling system from damage. While personal moves aren’t strictly bound by commercial federal cargo securement rules, following these professional standards ensures your gear stays put during transit. A solid base prevents the rest of the tier from collapsing when you hit a bump or take a turn.
Stacking Boxes Like a Pro
Efficiency depends on how you handle the middle layers. Place your heaviest boxes at the bottom of the tier. This prevents crushing. Use a “brick-layering” pattern. Offset the vertical seams of the boxes to increase the stability of the wall. It works. Label every box on the side. Don’t label the top. You need to see the contents when the boxes are stacked high. If you’re still looking for the right vehicle for the job, you can compare rental truck prices to find the best fit for your inventory. Once the boxes are in, slide mattresses along the side walls or use them as a “gate” for the tier. They act as giant shock absorbers. Finally, stuff soft items into the gaps. These small additions stop the micro-vibrations that cause damage over long distances.
Weight Distribution and Safety: The 60/40 Rule
Safety on the road depends on physics. Your moving truck packing diagram is more than a space-saver; it is a safety manual. The 60/40 rule is the industry standard for DIY moves. You must place 60% of your total cargo weight in the front half of the truck. This strategy keeps the center of gravity low and forward. It ensures the front tires maintain a solid grip on the road for steering. When the weight is positioned correctly, the vehicle handles more like a standard car and less like a heavy barge.
Loading the back of the truck too heavily is a common mistake. A tail-heavy load lifts the front wheels slightly. This causes the truck to fishtail or sway at highway speeds. It is dangerous. You also need to balance the weight from left to right. If one side is significantly heavier than the other, the truck will lean during turns. This increases the risk of tipping. A balanced moving truck packing diagram ensures the drive feels predictable and secure from the moment you pull out of the driveway.
Why Front-Loading is Critical
Concentrating weight at the front reduces unnecessary strain on the rear suspension and tires. It helps the vehicle react better to your inputs. You’ll notice improved steering response and shorter braking distances when the load is balanced correctly. The front of the truck is the end closest to the driver’s cab. This is where your heaviest appliances and densest boxes should live to keep the pressure off the rear axle.
Protecting Your Items from Shifting
Even a perfectly balanced load can fail if it moves. Use tie-down straps every two tiers to lock your inventory in place. Most rental trucks feature a rub rail along the interior walls. Use these rails as anchor points for your straps. It’s a simple step that prevents a domino effect inside the cargo area. Stop and check the load after your first 10 miles. This allows you to tighten any straps that settled during the initial drive. It gives you peace of mind for the rest of the journey.
Maximizing the “Mom’s Attic” and High Spaces
The “Mom’s Attic” is the specialized compartment extending over the truck cab. It is a critical feature of any efficient moving truck packing diagram. This space offers a separate sanctuary for your most fragile or high-value possessions. You should treat it as a protected zone. Because it sits high above the road, you must avoid placing heavy items here. Stowing heavy furniture or appliances in the attic raises the vehicle’s center of gravity. This makes the truck top-heavy and harder to control during turns. Always secure your items in the attic with straps or a barrier of soft goods. This prevents them from sliding out into the main cargo hold during a sudden stop.
What to Pack in the Over-Cab Space
The attic is the safest place for items that cannot withstand the pressure of a vertical tier. It provides a flat, stable surface away from the shifting weight of the main floor. Consider placing the following items here:
- Electronics: TVs and computer monitors wrapped in original boxes or heavy padding.
- Delicate Decor: Framed art, large mirrors, and fragile antiques.
- Essential Boxes: “Open-first” kits containing toiletries, tools, and bedding for your first night.
Having these essentials in the attic saves you from digging through the entire truck after a long day of driving. It keeps your high-value items isolated from heavy furniture legs and box corners. This isolation is key to preventing surface scratches and pressure cracks on delicate screens or glass.
Floor-to-Ceiling Space Optimization
A successful load leaves no air behind. You need to use every inch of vertical space in each tier. Rolled-up rugs are perfect for filling the long vertical gaps between the side of the truck and your furniture walls. Once you have built the base and middle of a tier, place lightweight items on top. Bags of clothing, pillows, and sleeping bags are excellent for reaching the ceiling. Never leave a gap at the very top of your load. Gaps invite the cargo to shift upward and over the tiers during bumps. This leads to damaged goods and a messy unloading process. If you are unsure which truck size offers the best attic space for your needs, compare moving truck rentals to see detailed specs before you book. Every cubic foot counts when you want to avoid making a second trip.
Choosing the Right Truck Size for Your Strategy
A perfect moving truck packing diagram cannot fix a vehicle that is five feet too short. You need the right tool for the job. Most people underestimate their total inventory by 15% to 20%. This leads to a common disaster. You finish your final tier only to realize the driveway is still half-full. Renting a slightly larger truck is almost always the smarter financial move. It is significantly cheaper than making two trips. You save on mileage fees. You save on fuel. You avoid the exhaustion of loading and unloading twice. Before you commit to a size, visit DityTruck to compare options across all major providers.
Common Truck Sizes and Their Capacity
Choosing the right size depends on your room count and the density of your belongings. A 10 to 12-foot truck is best for studio or small one-bedroom apartments. These are easy to drive and park. If you have a two to three-bedroom home, the 16 to 20-foot range is usually your ideal target. These sizes offer enough depth to execute a multi-tier moving truck packing diagram without running out of floor space. For large family homes with four or more bedrooms, the 26-foot truck is the industry standard. It provides the maximum volume allowed for a standard driver’s license. This size handles the heavy appliances and bulky furniture required for a full household move.
Compare and Save Before You Pack
Efficiency starts with the booking. Use the DityTruck comparison tool to find the best deal on the specific size you need. Prices fluctuate based on demand and location. If your journey takes you across state lines, check the availability for one way truck rentals for moving. These rentals often include unlimited mileage, which simplifies your budget. For those with a large inventory, it is wise to factor in the cost to rent a 26 foot moving truck early in the planning phase. Getting a clear price comparison allows you to focus on the loading process rather than worrying about hidden fees. A well-sized truck is the foundation of a damage-free move. It ensures your strategy works exactly as planned.
Take Control of Your Moving Day
A successful move depends on a solid plan and the right equipment. You’ve learned how a moving truck packing diagram transforms a chaotic pile of boxes into a secure, professional grade load. By sticking to the tier system and prioritizing the 60/40 weight distribution rule, you protect your belongings and ensure a safe drive. Don’t let the fear of running out of space or items breaking slow you down. You have the strategy. Now you just need the truck.
Finding the best vehicle at the right price shouldn’t be the hardest part of your journey. You can compare real-time moving truck rates and book your perfect size on DityTruck. Our platform allows you to compare rates from top national providers in seconds. There are no hidden fees to worry about. We offer national coverage across the United States to help you get where you’re going. Stop guessing and start moving with confidence today. Your damage-free arrival starts with the right choice.
Frequently Asked Questions
Where do I put the heaviest items in a moving truck?
Place your heaviest items, such as refrigerators, washers, and solid wood furniture, against the front wall closest to the cab. Keep these items centered between the wheel wells to maintain a low and balanced center of gravity. This placement is the foundation of a stable moving truck packing diagram and prevents the vehicle from becoming tail-heavy during transit.
How do I stop my boxes from falling over during the move?
Use the brick-layering technique by offsetting the vertical seams of your boxes as you stack them. This creates a locked structure that is much stronger than vertical columns. Tight packing is essential. Fill every small gap with soft items like pillows or blankets to ensure the boxes have no room to shift or tilt when the truck is in motion.
What is the 60/40 rule for loading a moving truck?
The 60/40 rule requires you to load 60% of your total cargo weight in the front half of the truck, which is the area closest to the driver. This distribution ensures proper weight on the front tires for better steering and braking. It also prevents dangerous trailer sway and fishtailing, which often happens when the rear of the truck is overloaded.
Can I stack boxes on top of my sofa or table?
You can stack items on furniture only if you use heavy-duty moving pads and stick to lightweight goods. Place a thick moving blanket over the surface first to prevent scratches or fabric tears. Only stack light, soft items like cushions or half-filled boxes of linens on top. Never place heavy or sharp-edged boxes on upholstered or finished wood surfaces.
How do I protect my mattress in the moving truck?
Seal your mattress in a heavy-duty plastic mattress bag and stand it upright against the side wall of the truck. This position saves valuable floor space and allows the mattress to act as a giant cushion for your furniture tiers. Secure it with a tie-down strap so it doesn’t flop over and crush smaller items nearby.
Do I need to use tie-down straps for every move?
Yes, tie-down straps are a non-negotiable safety tool for every DIY move. Use them to anchor your load to the interior rub rails every two tiers. This creates a series of independent, secure sections. If one item shifts, the straps prevent a domino effect that could damage your entire inventory before you reach your destination.
What should I never put in a moving truck?
Never load hazardous, flammable, or perishable items into your rental. This includes propane tanks, gasoline, paint thinner, car batteries, and charcoal. You should also avoid packing open food containers or plants that can attract pests or die in the heat. Keep your high-value personal documents, jewelry, and medications with you in the cab for total security.
How do I know if I rented a truck that is too small?
You’ll know the truck is too small if your moving truck packing diagram shows your tiers reaching the rear door while half your house is still on the curb. Most people underestimate their inventory by 15% to 20%. If you are moving a three-bedroom home, a 16-foot truck will likely be too cramped. Opting for a 26-foot truck provides the breathing room needed for a safe, single-trip move.